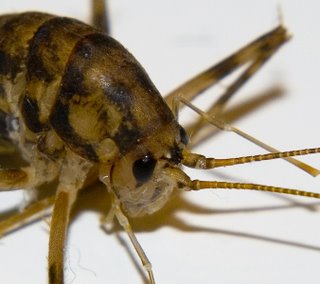
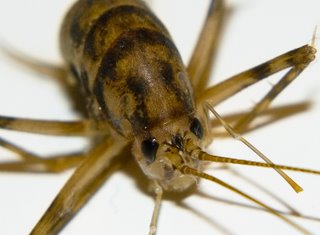
Friday, January 18, 2008

The Silence

I have not been writing much. Why? Quite simple. One thing that I have learnt in my quest to learn photography is that this is a slow process. Photography is made up of several aspects:

  • Skill, as in technique
  • Composition, the artistic side
  • Science, a little like skill bit with more emphasis on lighting and optics rather than camera handling
  • Post processing. Yep, my friends, most pros and amateurs alike fake their pictures, oops! I meant post process quite a bit.

So in order to get good pictures one needs to master all of the above. Then there is equipemnt which is not cheap. Put all this together for a person who has a life, as in a job and a family, things tend to get slow. But don't worry, I have been taking pictures steadily.

To keep up to date with some of the pictures I am taking you can look at my pictures on Flickr at http://www.flickr.com/photos/mogambo.

Labels: ,

Friday, May 25, 2007

Macro Photography - Reversing a Lens

In a previous post I talked about using diopter lens as a cheap way for doing Macro photography. Another option that is avaliable is reversing a lens. Any lens can be reversed to achieve some level of magnification. The shorter the focal length the higher the magnification.

For my Nikon D80 I bought the BR2A ring that screws into your lens filter threads on one side and then mounts on to your camera from the other. Thus enabling you to reverse your lens. The lens I use is a Sigma 28-70 mm zoom. At 28mm I get maximum magnification.

Here are some sample pictures taken using this technique:


Please note I have not done any significant cropping to enhance the size of this image or the following one.

Pretty impressive levels of magnification by spending just a few dollars for the BR2A reversing ring, isn't it?

Its not all that easy

Reversing a lens for macro photography is a cheap way to do Macros but its not always that easy. There are several issues with this approach:

  • The problem with most macro photography is depth of field. As you get closer to the subject your depth of field gets lesser and lesser. What this means is that you aim at the head of a spider and you barely get a part of it, the rest of the spider is a blur. How do you solve this problem? Well you increase the f stop, i.e., reduce the aperture. Ahaa! but now you have two new problems, not enough light and you can't see a thing.
  • As you reduce the aperture you get greater depth of field but you do not get enough light. So now you need to make sure you have plenty of light natural or with a flash. This is not always easily available if your subject is an insect in the wild.
  • Also, when you reverse your lens you loose all camera functionality such as metering and aperture control etc. Now everything is manual. So when your lens is reversed and you reduce the aperture none of your camera's mechanisms are at work. So when you look through the viewfinder, i.e., through the lens very little light is coming through. In fact in some cases almost no light comes through. This makes it virtually impossible to focus. So now you have a catch 22 situation. Wide aperture, plenty of light, easy to focus, NO DEPTH of FIELD. Narrow aperture (large f number) great depth of field but no light for exposure, even worse, not even enough light to focus.

So is lens reversal a bad idea then? No, its all about knowing when to use a certain technique. Direct lens reversal is great for stationary subjects. This way you can focus first and then change the aperture to get some depth of field, then release the shutter. But if you are chasing a bee in your garden, this may not be the best approach.

So is there an affordable way to chase a bee in your garden and get great macro shots? Well I intend to try another form of lens reversal for that. More on that soon....

Labels: ,

Sunday, April 08, 2007

Books to read - A quick post

This is a quick post to list some books that I think are worth a read. There is no shortage of books on the subject of photography and of course there are a gazillion web sites on the same subject. The two books I am suggesting are ones that I have read and so I can speak for them.

  1. Closeups in Nature - John Shaw. This book provides great insight into nature and macro photography and all the technical information you will need.
  2. The Digital Photography Book - Scott Kelby. This is a book that may require some explaining. There is no real knowledge imparted in this book. When you read it you will most likely say "I knew that." However, the reason I liked this book is that it provides quick tips on how to do various types of photography. As a beginner I find that I may have learnt a lot about cameras, lenses, apertures, speed, exposure etc but putting all that knowledge to practice is not always easy. This book with its quick one page tips helps your bring all what you have learnt into perspective and tells you what and how to do without focusiing on the physics.


Labels: , ,

Tuesday, January 16, 2007

Buying tripod - Part 2

So I started my venture to buy a tripod. My first take was that I need something with three legs on which I can put my camera. Right? Wrong!!!!


A good tripod is a must. Buy a cheap tripod and you will undergo immense frustration instead of the joy of photography. The problems with a bad tripod are:


  • They are unstable, i.e., they move a lot.
  • They vibrate so the shutter of the camera can result in a movement that can spoil a picture.
  • The levers to adjust the camera angle on a bad tripod will drive you nuts. Just when you think you have the right position and your hand moves off the lever the camera dips.
  • They do not offer too many features, i.e., angles in which a camera can be mounted.
  • They do not provide the ability to change the mount/head, i.e., the part to which the camera is mounted and which swivels etc.

So basically a good tripod should shield you from all of the above. Then what should a good tripod have?

Stable and Light Weight

Most good tripods will offer great stability. Of course this stability comes at a cost. Not just $$ but also weight. I need a tripod that I can carry. I do not do potrait photography. Carrying a tripod on a long backpacking trip in the mountains can be a pain. So I needed something stable yet light enough to carry. This made my search tougher, though not impossible.

Changeable Heads

A tripod should allow you to change the type of head being used. To the best of my knowledge there are two types of heads that fit on a tripod. A ball head and a three way head. I ball head screws on to a tripod and then you attach the camera to the ball head. It has a singled knob used to tighten it once your camera is in position. The camera is positioned by simply rotating it on the ball head.

This is a Bogen Ball Head.


A three way head has three levers that allow you to move the head and then you tighten them when you find your position. With a three way, you can loosen just one lever that will allow movement in just one direction.

This is a Bogen three way head.


Low Min Height


Th tripod should be able to go very low. Almost to ground level. This allows you to take pictures of small flowers and insects.

Horizontal Camera Mounting

Another critical feature for me was the ability to mount my camera such that it is facing downwards. Some tripods offer this feature by letting you remove the central beam on which the camer is mounted and place horizontal. See picture below.

Having laid down my criteria I went looking for tripods and realized they were quite expensive. Then based on recommendations from several friends I ended up buying the following:

  • Bogen / Manfrotto 3021BPRO Tripod Legs with 804RC2 3-Way Head & Case
  • Bogen / Manfrotto 486RC2 Compact Ball Head w/Rapid Connect System

The legs with the three way head and bag cost me $180 and the ball head about another $60. I got lucky as this was on sale. By no means is this cheap but its teh cheapest good quality tripod and head system I could get my hands on. I have to say this. I love this tripod. It is stable, the heads move with precision, there is no sagging after you take your hands away.

Labels: , , , ,

Thursday, December 28, 2006

Buying a Tripod

So I decided to hit my next step. Buy a tripod. Why? Well, there is always that time when your hands are just not stable enough. Your camera on a stable tripod allows you to take pictures where the slightest shake would ruin the capture. Then there are those long exposure shots that you may like to take. I am not a studio photographer nor do I have any current interest in that arena so I am not even going to discuss the advantages of a tripod from that point of view.

Everything in photography eventually comes down to light. How much light you can get. There are several factors that determine total amount of light received:
  • Aperture (size of opening in the lens that determines how much light gets through)
  • Shutter speed. Time the shutter remains open.
  • Speed of the film (sensor nowadays)

Longer exposure, larger aperture (smaller f number) and faster ISO gives you more exposure to light. However not all are possible at all points in time.

  • Higher ISO usually results in lower quality pictures. So there is a limit to how much you can push this to get more light or exposure.
  • A large aperture (small fnumber like f2.8) will give you plenty of light but no depth of field. So when very close to an insect you will get its head but its body will be out of focus.
  • A slow shutter speed will give you plenty of light but the slightest movement of eth subject or of your hand will result in a blur.

Usually a combination of the three is used along with artificial lighting such as a flash. However, there are situations when these are not enough. You are always restricted by the capability of your lens with regards to its speed (maximum aperture) and hence you are limited to one option, i.e., increasse the exposure time by reducing shutter speed. Which then exposes you to the risk of blurry images.

Now a tripod will not stabalize a cheetah running at 100 mph on a dark cloudy day, but it definitely helps when what you need that one additional step.

So anyway, I need a tripod, big deal, just go buyone, right? Well not exactly. Buying a tripod can be a complex process. More about that in my next post.

Labels: , , , ,

Tuesday, November 28, 2006

Back to Macro Photography - Close Up/Diopter Lens

When I started this blog one of my first articles was on explaining what a macro lens is. http://shutterology.blogspot.com/2006/06/understanding-and-buying-macro-lens.html

Since then I have changed cameras and am now with my new Nikon D80. The one problem most photography enthusiasts face is the high cost of equipment. So I decided to take my attempts at Macro photograhy in small steps.

I started by purchasing a cheap set of Tiffen close up lens of +1, +2, and +4 diopters. These lens are like filters that help you focus in closer. They are NOT true macro lens and the image quality you get is not necessarily that good. However they do have some advantages:

  • For less than $50 these diopter lens are not a bad way to start looking at objects from up close.
  • They do not reduce the amount of light going through.


Since the close up lens/filters let you focus in closer, i.e., distance from object, you can get a larger image. Be careful though. In some cases I was way too close to the subject. While taking pictures of a bee I was stung a few times. Not fun!!!!!

Magnification attained by using a diopter lens is focal length of prime lens / focal length of diopter lens.

The focal length of a diopter lens is computed as 1000/diopter power. So a +2 diopter lens used on a 50 mm lens will give you a magnification M = 50/(1000/2) = 50/500 = 1/10 = 0.1X.

Stack a few diopter lens to get a total of +7 ( I used a +1, +2, +4) as I did for the pictures below and nwo you have M = 50/(1000/7) = 50/143 = 0.34X. Not too shabby for a $30-50 investment.


While I like the pictures above, I have a lot more to learn. A visit to any photography site will show you what amazing pictures can be taken using a Macro lens. Pictures from a Macro lens are not limited to little critters. Very fine potraits, pictures of water drops, dew, spider webs, flowers, etc can all be taken with a very unique perpective.

Based on the few pictures I have been taking and on what I have been reading up I realized that I need the following:

  • A good tripod.
  • A good flash (lighting is essential to all photography, Macro photography is no exception)
  • A good Macro lens or other lens that can be used as a macro by reversing them (more on this later)

In following posts I plan to write about my experience and analysis in acquiring this equipment followed by my experience using it.

Friday, November 10, 2006

Whats been going on?

I have been quiet for a while. Mostly because I am trying to learn about the Nikon D80 before I go ahead and try to learn some advanced photography. Knowing how your camera works is critical.

In the mean time I am also reading up on macro photography. I had written a little in teh past about macro lenses. This is a subject I will be returning to very soon. In addition to Macro lenses I will talk about other options for doing Macro photography. A macro lens can be quite expensive.

More later ...